Sunday, November 30, 2008

Storm at Sea Piecing is Complete

I finally finished piecing the top of our king-sized Storm at Sea bed quilt. I laid it over our bed to get an idea of the coverage. Each block was 12"x12". I put it together 6 blocks by 8 blocks, and pieced it randomly. I tried to keep the same fabrics away from each other, but couldn't avoid it in a couple of instances.

The hardest part was getting all the points and edges to meet while sewing it together. Because I pieced it over a period of about a year, it was hard to stay consistent with my seam allowances. If you don't cut each piece exactly like the other, and don't use the exact same seam allowance, there will be variations that result in points and edges not matching up.

The next step will be to assemble a backing and patch some batting together to make it wide and long enough to cover the dimensions of the quilt, and then sandwich it all together on my quilt rack.

I made sure that the quilt will hang well over the sides of our bed, because my husband and I tend to fight over the covers. This length will allow us each more than enough material to keep us warm.

Monday, October 20, 2008

48 Blocks Later

I finally finished the 48 Storm at Sea blocks I needed to put together a king-sized quilt. The stack is 7-inches thick.

Let me introduce you to one of my sewing machines: My old New Home. Now let me introduce you to my worst enemy:

The bobbin casing. For some reason I can never get the bobbin case to pop into its socket. I have to push and push while moving the needle up and down and maybe after five minutes of struggling it decides to go in. For that reason, I dislike it when I run out of bobbin thread.

I'm very unlucky in the sewing department. I'm surprised that I've worked in the field of fabric art for as long as I have, because Murphy's Law is in full effect when I am sewing. I got down to the last few stitches on the last block, and the bobbin thread ran out. Had that extra few inches of thread been there, I could have been done for the night. Instead I had to tack another half hour onto my sewing time while I prepared half a dozen bobbins with thread and then fussed to get that bobbin case to pop in.

Why do half a dozen bobbins need to be threaded? Because it saves me the trouble of having to unthread and then rethread the top thread each time I need to wind another bobbin. Once I get that tension set, I don't want to mess around with the threading.

Now all I've got to do is make a decision on how to join those blocks together. I was thinking of blending dark to light based upon the darkest hue in the block, but realized that some blocks might fit or match the seams better than whichever shade is next in line. I'm thinking I should join them up in a semi-random fashion, the only two deciding factors being if the seams match well and that the greens are spread out. The majority of the quilt is black, white, blue, and purple, but there is some green to make it pop. Since the green stands out, it has to be placed in a balanced manner.

Monday, August 11, 2008

Most Recent Storm at Sea Blocks

Yes, I'm still working on that king-sized Storm at Sea quilt. Here are some recent blocks I created. It will be a while yet before I piece all the blocks together. Winter is always a better season for quilting, since it is too cold and wet to be outside working with my horses.

Saturday, July 19, 2008

Skull & Skeleton Fabrics

I know. I'm weird. Who in the world would buy fabrics with skulls and skeletons on them? Well, I have a brother who could probably use a quilt. I don't know what he's sleeping on now, but if it isn't a cardboard box or the floor, it's most likely a couch. He has very cold winters and can't afford to buy most things that a lot of us take for granted.

In his heyday, he was a Deadhead. That's a fan of the music band called "The Grateful Dead". I thought he might tolerate me making him a quilt if it reminded him of Jerry Garcia.

I have no idea how I am going to piece these fabrics yet. They don't exactly match. The orange batik fabric is a bit out of place, but so beautiful that I couldn't pass it up.

Tuesday, May 27, 2008

Teapot Potholders

On my other blog site, Nuzzling Muzzles, I held a contest to see who could guess the date that came closest to when my new hay tarp developed its first rip. The winner of the contest won quilted potholders made by me. I decided on potholders because they are small, and I thought I could make them quickly. However, I found this project to be quite difficult, as the piecing wasn't coming together as nicely as I would have liked. I used my seam ripper in equal proportion to how much time I actually spent sewing, so the fabric ended up being worn and ragged. I had to secure it by quilting cross-hatched lines close together, which resulted in the potholders being stiff.

I took this pattern from "Cups and Saucers Paper-Pieced Kitchen Designs" by Maaike Bakker. This book includes patterns for cups on saucers, dishes, mugs, pitchers, plates and bowls in addition to the tea kettle.

Fortunately, I did some research before making the potholders and discovered that you have to use cotton batting, because polyester absorbs heat and can catch fire. You also should use a layer of Insul-Bright needled insulated lining to protect the hands from being burned while using the potholders.

Insul-Bright lining can be used for hot pads, oven mitts, tea cozies, casserole warmers, beverage holders, baby warmers, lunch bags, place mats, table runners, picnic baskets, shades, draperies, door draft stoppers, fire place covers, water heater covers, comforters, quilts, sleeping bags, water bed covers, coats and jackets, vests, ski apparel, gloves and mittens, hats, slippers, ironing board covers, and outdoor stadium cushions.

It took me about two weeks in the month of May, 2008 to complete these. My quilted items ended up being big enough (9x9") that they can be used as hot pads as well as potholders. Hopefully, the winner of my contest will get some good use out them.

Thursday, May 15, 2008

Storm at Sea Progress

Because there is such a long blog pause between completing each of my quilts, I thought I'd post on my progress. Here are some Storm at Sea blocks that I recently completed. I'm making a quilt big enough to cover the top and sides of a California King mattress, so I have to make A LOT of these.


To help me out, my daughter gave these fabrics to me as a gift for Mother's Day:


She has shopped fabric stores with me often enough that she understands that I am not just looking for blue, teal, and green fabrics, but I am looking for fabrics that have movement that either mimics water or could be construed as water in an abstract sense. She did a good job in picking these out.

Thursday, April 17, 2008

Sunburst

"Sunburst" was my thirteenth project, a lap quilt with an irregular shaped border. I once again used the stack-n-whack (Bethany S. Reynolds) / kaleidoscope (Paula Nadelstern) method of rotary cutting and piecing. Each flower is stuffed to give it a 3-D effect of blooming or bursting forth. The entire quilt was machine sewn, though I don't recommend that puff quilts be quilted by machine. It was very difficult to quilt stitches around each puff on the rack, because the bulk and irregularity did not roll up evenly, causing different tensions on the material. Despite readjusting the thread tension repeatedly, the top thread still broke often and the bobbin thread got tangled beneath the sandwich.

I think this quilt was started some time in early 2007 and completed April 17, 2008. Though it is not a large quilt, it was a thorn in my side, which is why it took so long to complete. Even when I was sewing on the thin yellow border to cover the raw edges, I ran out of bobbin thread just inches before completion. I have knack for getting down the the last inch or last few seconds of a project only to have some complication fly out of left field at me. My celebratory mood gets deflated, and the process of reaching completion always take longer than anticipated.

This quilt has a yellow background and flower puffs of pink, purple, orange, yellow, and green. I grouped similar colors together to bring out a gradual blending effect. The irregular border blends from color to color as well. I did not position all the flowers before sewing, so I ended up with one row that looks straight, and as each flower was added, I discovered that I could not fit them in rows due to the irregular border. Therefore, the flowers start in a row and end up random. People have commented that it looks like a mistake. I lie and tell them I did it on purpose.
Saturday, January 5, 2008

Crazy Quilt Conundrum


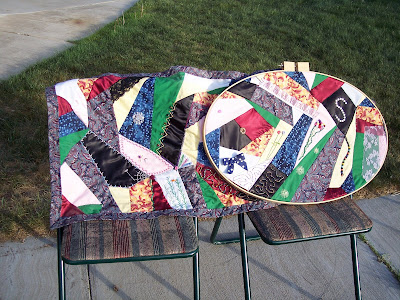
"Crazy Quilt Conundrum" is a quilt that has no beginning and has no end. I've had it around the house for years and keep seeing some blank space where I can add more embellishments. It speaks for itself.


Stained Glass Sierra


"Stained Glass Sierra" is a wall hanging that was completed in June of 2006. I created a custom design using Electric Quilt 5 software and printed out portions of the template onto 8.5x11 sheets of paper. I then pieced the sheets of paper together like a puzzle with tape. The paper templates were pinned to the fabric and the fabric was cut out, then sewn together by machine. I then pinned and sewed black bias tape along the seams where different color fabrics were joined together, giving the illusion of stained glass. Most of the fabrics were specifically for stained glass quilts, but I took the liberty to adding in flower prints with thick outlines to echo the thick bias tape. The design includes two rows of flowers in front of a meadow and a pine tree, which are in front of Job's Peak, Lake Tahoe, and the setting sun. The sky displays variations of a sunset. We could not find a way to hang it due to its irregular shape, which is a rectangle with a rounded top -- like a church window, so I taped the edges to the wall with packing tape.

Jungle Luscious


"Jungle Luscious" is a lap quilt with an irregular shaped edge and zebra stripes for a border. The main colors are a plant leaf green and orange. A jungle fabric was used that contained animals, plants and flowers cut and pieced into a kaleidoscope (Paula Nadelstern) / stack-n-whack (Bethany S. Reynolds) pattern with six 60-degree triangles. Quilted with a long arm machine on a rack, which was challenging because the needle couldn't penetrate the center where six pieces met, so I had to swing around the centers. Since there was such a radical change in thickness of fabric based on how many pieces met at the seams, the sewing machine kept jumping and the stitches came out sloppy and uneven. There was one corner where the backing and the binding didn't meet. The quilt is interesting to look at from a distance, but the stitching is horrendous. It took one or two years to complete the quilt, because I was so busy. I finished it in August of 2005.

World Without End

"World Without End" was my tenth quilt, created on impulse after being inspired by the "World Without End" pattern found in "The Big Book of Quilting" by Cassia B. Farkas. I had been wanting to construct a "Storm at Sea" pattern, which is very complicated, and the "World Without End" pattern looked like a good stepping stone toward "Storm at Sea." For coloring, I chose light and dark greens alternating with light and dark purples. Much white was used for the lighter pieces to assure definite contrast. Many different pictures can be seen within the rotating patterns including stars, fish and spaceships. The backing is dark purple and was folded over to be used as binding around the edges. The quilt turned out to be about the size needed for a twin bed. I believe I began constructing it while between jobs in 2003 or 2004 and finished it while between jobs in August of 2005.

Chicken Prints


"Chicken Prints" was a set of place mats constructed from Moda's "All Cooped Up" fabrics. One side is a motif of chickens surrounded by chicken footprints. The other side is a motif of chicken coop wire surrounded by chicken footprints. The colors are primarily off-white, black and burgundy. I used a chicken coop wire motif for the quilt stitches. This was a gift for my mother's 72nd birthday, and it took two days to make; completed in August of 2005. I used temporary basting glue to help keep the seams of the binding turned under as I pinned it.

Star Garden


"Star Garden" was my eighth quilt, a piano bench cover with an irregular shaped border. This quilt is reversible with stars made out of jungle flower print fabric and greens on one side, and stars made out of a multi-colored striped straw-like geometric print fabric and yellow and purple on the other side. I used the stack-n-whack (Bethany S. Reynolds) / kaleidoscope (Paula Nadelstern) method of rotary cutting and piecing. The entire quilt was machine sewn. The quilting consisted of following the 60-degree triangle borders on one side, which results in the thread not matching the seams on the other side. Sloppy, sloppy, but interesting.

Always in Bloom


"Always in Bloom" was my seventh quilt, a gift for my mother's 70th birthday. It was started in June of 2002 and finished in July of 2002. It was an experimental effort that was a cross between kaleidoscope (Paula Nadelstern) / stack-n-whack (Bethany S. Reynolds) and puff quilt methodology. The same fabric triangle was cut 6 times, and then the wedges were sewn together for a kaleidoscope effect. The fabric used was a bright medium print with a variety of colors, flowers, and leaves. I returned to the fabric store 3 times to purchase more of this fabric in order to have 6 repeats available to make enough patches for a twin-sized bed quilt. In all my fabric quests, I had never found a bolt that lends itself more to this type of project. The variety of hexagonal blocks that could be created from this particular fabric seemed endless. Some blocks ended up being primarily green, some white, some pink, some red, some blue, and some purple. I bought a bolt of leafy green solid Wal-Mart special for $2.00 a yard to use as the background, backing, and binding. I appliquéd each hexagon block onto the background and stuffed it before closing. This gave each block a 3-dimensional effect of a blooming kaleidoscope of flowers. I machine quilted around each hexagon to attach the top, the batting, and the backing. Because the blocks were stuffed, it was impossible to sew the background and backing taut without having a professional setup.

Fuzzy Rag


"Fuzzy Rag" was my sixth quilt, started in December of 2001 and completed in January 2002. It was pieced together in squares from flannel fabrics that were given to me as a gift from my husband on our 13th wedding anniversary. (Fabric is always a great gift for quilters on any occasion.) This quilt was modeled after several rag throws I spotted hanging in various fabric shops. It was stitched with wrong sides together, and the seams became the fuzzy part by cutting them into tassels and washing. The flannel fabrics display a fall theme with fall colors and leaf motifs. This lap quilt is just as warm as double-layered quilts with batting, only without the bulk. If you want a fast project, this is the way to go.

A Pocketful O' Friends


"A Pocketful O' Friends" includes two wall hangings with quilted pockets for the purpose of storing Beanie Babies and other stuffed animals. The design was based on the "Signs & Symbols" wall hanging on page 79 of "Scrap Quilts Fast and Fun", edited by Patricia Wilens. My daughter helped trace and cut out the shapes that were placed in the center of each pocket, including circles, squares, triangles, diamonds, hearts and stars. The fabrics were bright, high contrast colors, and black and white stripes, checks, polka dots and swirls. My son's quilt background was a fluorescent blue, and my daughter's was a fluorescent green. Both the background and pockets were quilted with a scribble pattern using black thread and a walking foot. Though no borders were created and the edges ended up jagged, I considered these two quilts an opportunity to practice quilting. My daughter and I decided that the more mistakes I make -- the better, since we wanted the quilts to look as if a child had slapped them together. The quilts were started around July 2001 and finished just before Christmas 2001.

Waves of Memories


"Waves of Memories" was my third quilt, constructed from the clothes my son wore between the ages of 2 and 7. It is a twin-sized bed spread that my son has been using for the past 7 years. It was pieced from a "Charmed Ogee" template with attempts at alternating light and dark blocks. The border is green broadcloth with burgundy binding. The backing was pieced with green, burgundy, and dusty blue broadcloth. A tulip template was followed for quilting in the corners. Otherwise, the rest of the quilting involved stitching in the curvy ditches. This quilt was started around January of 2001 and completed around June of 2001, and given to my son as a gift.

Lessons learned: Use safety pins for basting, not thread, and always start quilting from the center. Be careful when piecing different fabric types. This quilt involved attaching cotton to spandex to flannel to polyester...

Sunflower Setting


"Sunflower Setting" was my second quilt. This is just a small portion of it. In my frazzle frenzy, I've managed to wear it down so much that many of the seams are ripped and patiently waiting for repair. Since then I have learned to allow bigger seams and double stitch to prevent ripping. It sports hand-designed sunflowers and leaves pieced from a variety of fabrics and laid upon a sunset background. The sunset includes lavender, deep purple, electric blue, and a black night sky print with white stars. Sections of the sunset include a 3-color pattern called "Evening at the Lily Pond." The borders are two forest green prints with golden sunflowers, lined with lavender and deep purple oblong triangles. The majority was hand-sewn, but the time pressure to complete the quilt by Christmas led to the borders, rough appliquéd sunflowers and backing to be machine sewn. There was not enough of one broadcloth color to cover all the backing, so I cut four broadcloth colors (lavender, deep purple, light green, and forest green) into large triangles and machine-pieced them together. I had made several trips to the fabric department to acquire more broadcloth, but the hues of each bolt were drastically different. I'm sloppy about doing the math BEFORE I start a project, and often suffer the consequences later. This quilt was originally planned to be a wall hanging, however it grew into a monstrosity that ended up being a queen-sized bed cover. Gold metallic thread was used to tack down the sunflower petals, and at the same time quilt a satin stitch through the three layers, which created sunflower outlines on the back. Green thread outlined the large leaves in the leaf stitch. It was started around July of 2000 and completed by Christmas of 2000.

First Child


My first quilt was called "First Child." It is a twin-sized bed spread constructed from the clothes that my daughter wore between the ages of 2 and 8. Children's clothes are loaded with interesting patterns and color schemes. The quilt is composed of 9 rows of 6 "Dutchman's Wheels," 8-inch blocks separated by mauve, rose, and rust borders. "Flying Geese" line the outside border. The backing is a dusty-blue rose print. The pieces were rotary cut and hand-sewn. The layers were tied together with triple French knots originally, but they easily broke since my daughter has kept the quilt on her bed for 7 years now. I quilted a train of elephants on it to hold it together years later. The quilt was started around January of 2000 and completed around August of 2000. It was given to my daughter shortly after she turned 10-years-old.

My Design Wall

The is the king-sized Storm at Sea bed quilt I am currently working on. I hung a fuzzy, cream colored blanket over a dowel, and pin my blocks to it as I complete each of them. Once I have all the blocks, I can move them around on this design wall to see which color combinations work best together both close up and from a distance. It sure beats having to vacuum the floor before laying them down, and then having the dogs walk all over them!

The First Stitch

I vividly remember the day I decided to start quilting. I had been working 60 to 80 hours a week as a software tester and desperately needed to relieve some stress. Though out of character for me, I left my computer to take a long walk and ended up in the stationary aisle of a supermarket. There on the cover of a quilting magazine was the most extraordinary design of pieced fabric I had ever seen. Just looking at it relaxed me, so I bought it and kept the magazine on my desk at the office until I finally found the time to pick up some quilting supplies of my own.

I soon found myself hand-piecing various quilts in my recliner each evening before bed, and slept much better after all that sewing. The meditative quality of pushing and pulling a needle and thread was just what I needed to lower my blood pressure and gather my wits at the end of each day. Shopping for fabric for current and future projects became a favorite past-time, and I found that I was most attracted to vivid colors, mostly purples and greens. After a while I had to balance out my stash with other colors and varying shades of lights, mediums, and darks.

I have an old New Home sewing machine that has served me well. However, as I became more ambitious with my quilting, I needed a long-arm machine in order to sew my bed quilts. So, I bought a long-arm Brother sewing machine and quilting rack to rein in all those layers of fabric and batting. My quilting frame usually has a quilt on it, and is the first thing that people see when they enter my home. I am often asked if I sell my quilts, and my answer is always that I hope to someday, but I can't seem to let go of the ones I've already made.

My fabric stash: All the blues are missing, because I am in the middle of piecing a king-sized Storm at Sea bed quilt.